Getting Started with Service Foundry on Local Machine
Introduction
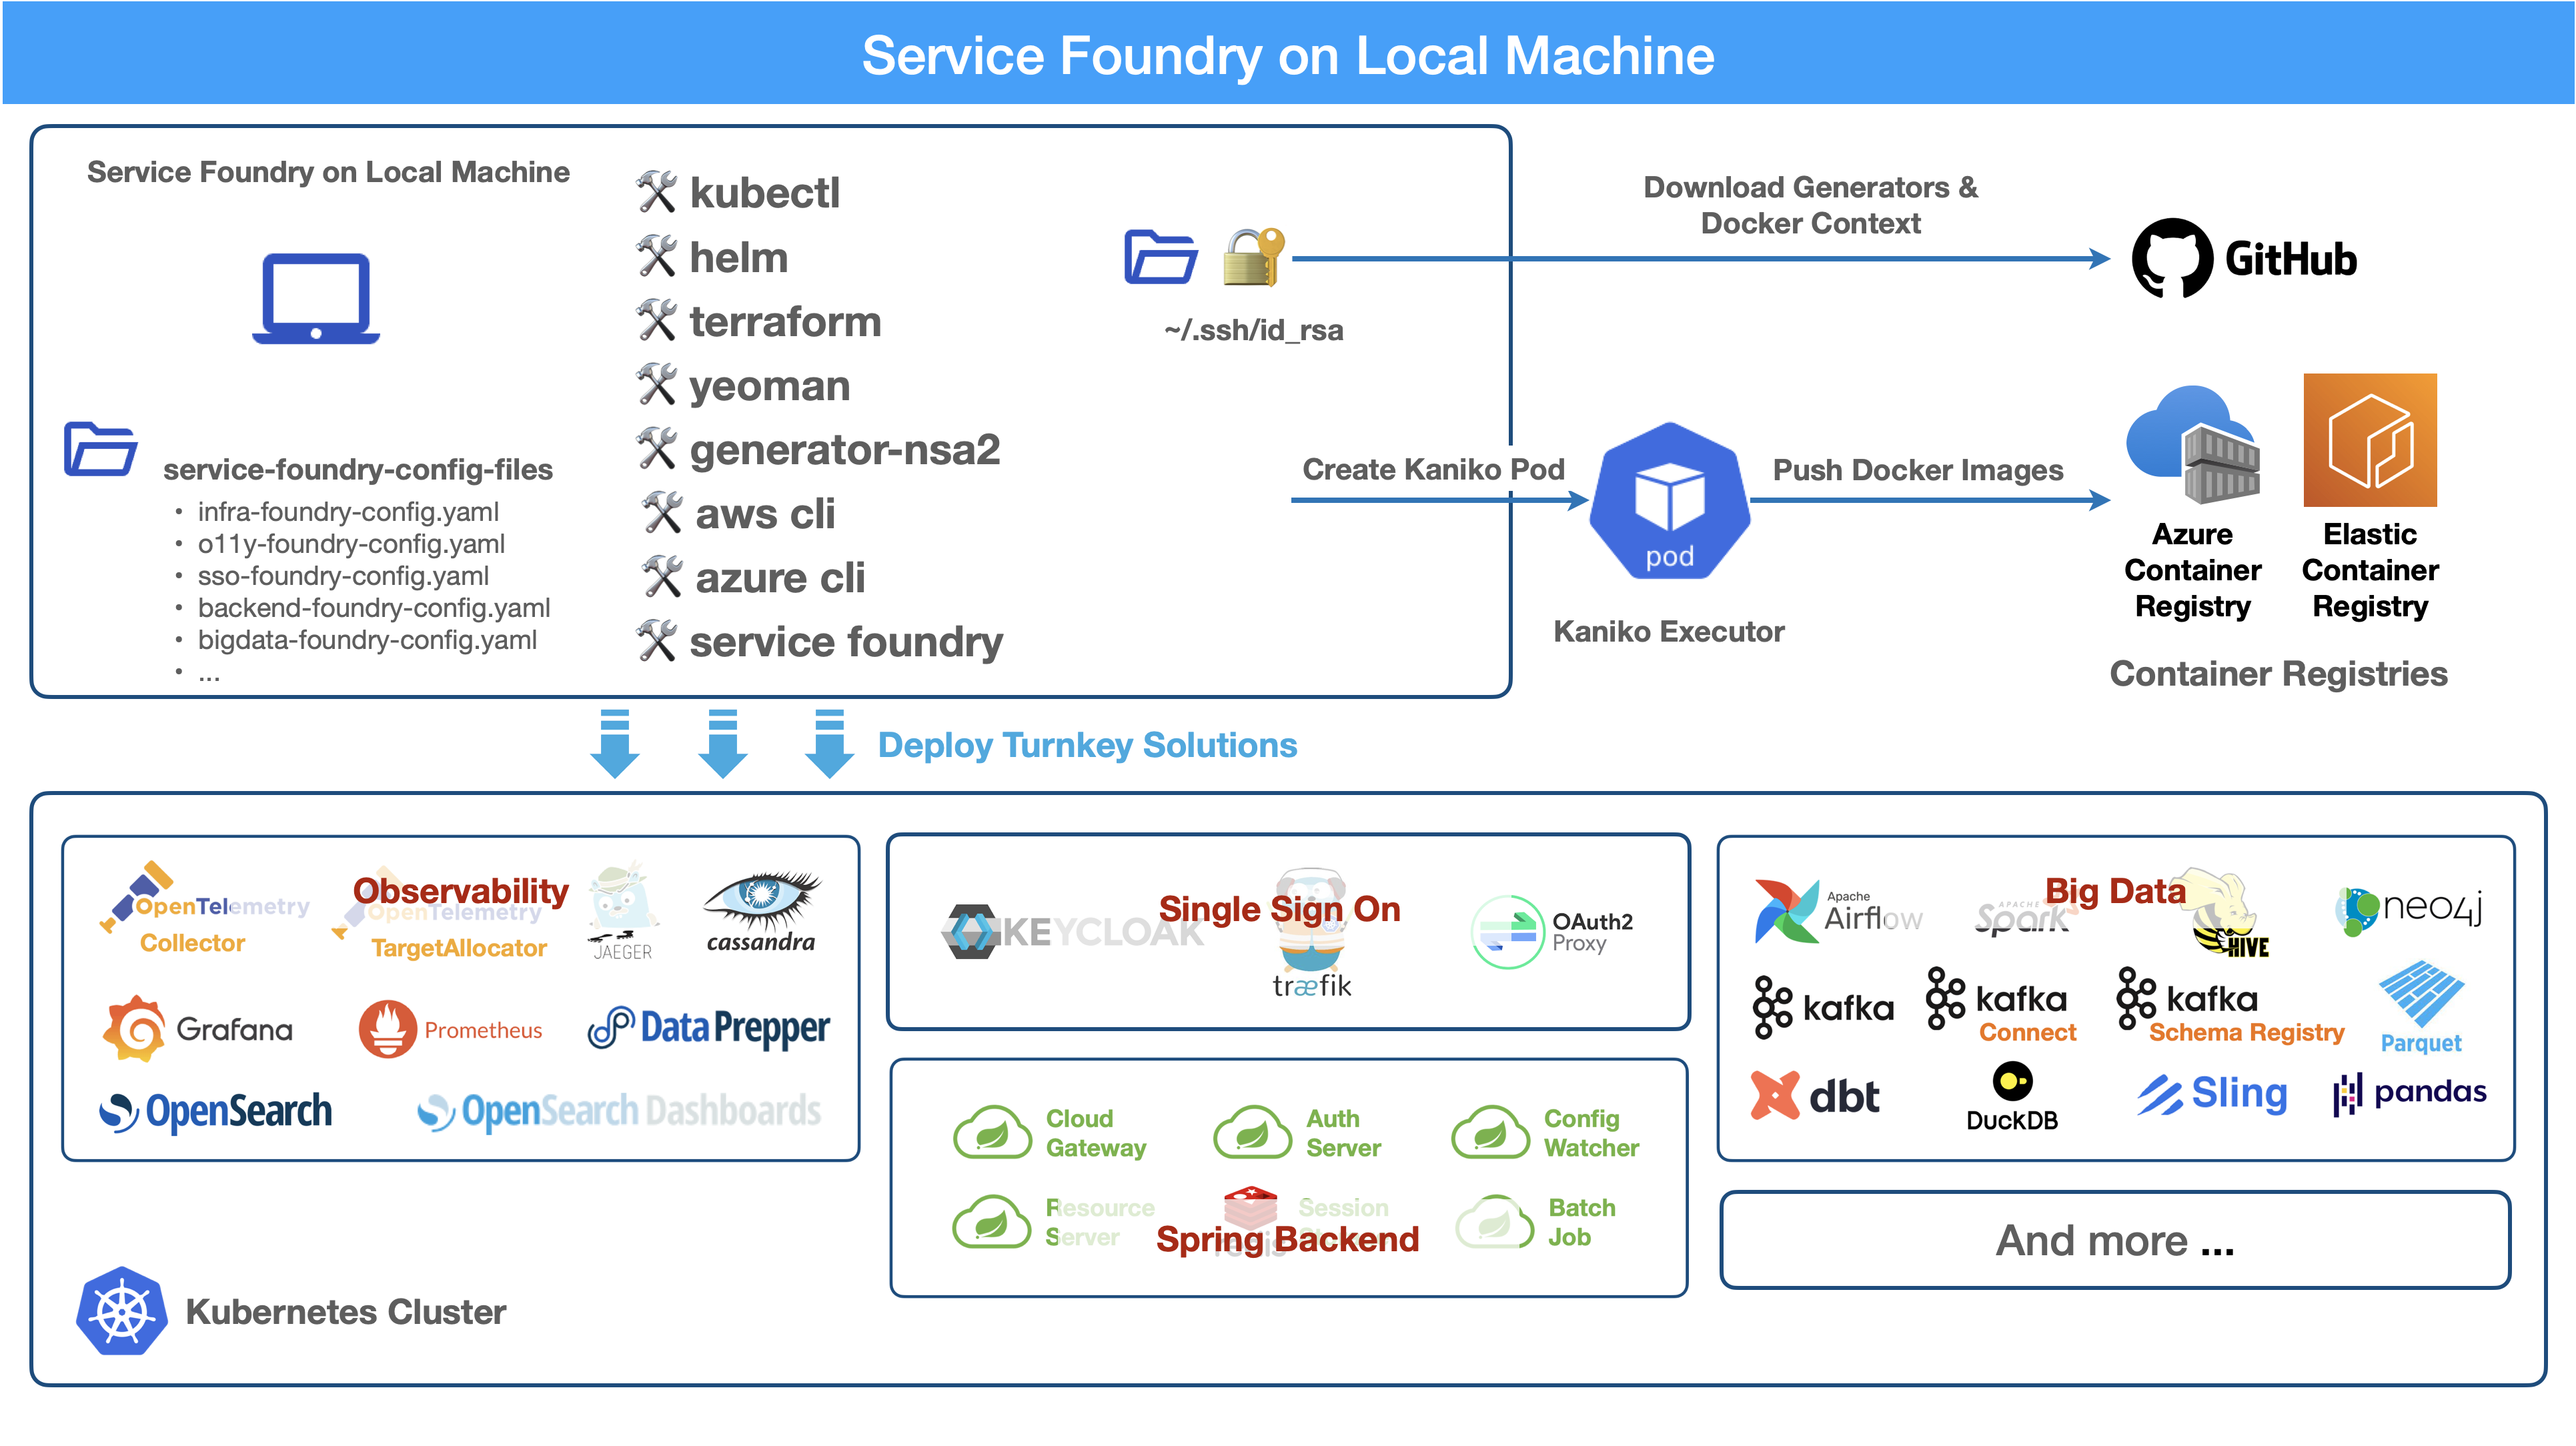
Service Foundry is a platform for deploying and managing applications in a Kubernetes environment. It provides a set of tools and best practices for building, deploying, and scaling applications in a cloud-native way.
Prerequisites
As Service Foundry is a set of tools to create and manage Kubernetes resources, you need to have the following tools installed on your local machine:
-
Kubernetes cluster (EKS or AKS)
-
kubectl
-
Helm
-
Docker(optional)
-
Terraform(optional)
-
jq
-
yq
Working with Service Foundry on your local machine
One of the main components is the generator-nsa2, which is a Yeoman generator that generates the configuration file and all supporting files required for installing applications on Kubernetes. Node.js and npm are required to install the Yeoman generator.
-
Install the latest Node.js LTS version
-
Install Yeoman
Install Node.js and npm
To install Node.js and npm, you can use Homebrew on macOS. If you don’t have Homebrew installed, you can install it by running the following command:
$ brew install node
$ node -v
$ npm -v
Install Yeoman
Install Yeoman globally using npm. Yeoman is a scaffolding tool for modern web applications. It provides a generator ecosystem that allows you to create and manage projects easily.
$ npm install -g yoGetting generator-nsa2 from GitHub
|
As of writing this documentation, the generator-nsa2 is a private repository. Contact the author to get access to the repository. |
$ git clone git@github.com:nsalexamy/generator-nsa2.git
$ cd generator-nsa2

$ npm install
$ npm link
Working with infra-foundry module
Infrastructure Foundry is a set of tools to create and manage the infrastructure for your application. It includes tools to create and manage Kubernetes clusters, Helm charts, and Docker images.
Create a working directory and go to it. Then run the following command to create a new project for Infrastructure Foundry.
$ mkdir nsa2-foundry && cd nsa2-foundryService Foundry init step
Run the command to generate 'infra-foundry-config.yaml' file.
$ yo nsa2:infra-foundry initYou can edit this file to customize the configuration for your application.
Service Foundry generate(or gen) step
Run the command below to generate required files including:
-
Kubernetes resource files and kustomization.yaml
-
Custom values file for Helm charts
-
Terraform files
$ yo nsa2:infra-foundry generate
Service Foundry build step
|
The infra-foundry module does not need to push custom Docker images to the Container Registry. So, you can skip the 'build' step. |
Service Foundry deploy step
Run the command below to deploy the generated files to your Kubernetes cluster.
$ yo nsa2:infra-foundry deployBy default, it will install the following tools:
-
cert-manager
-
Keycloak
-
Traefik
-
Prometheus Operator
-
OpenTelemetry Operator
Working with o11y-foundry module
The o11y-foundry module is a set of tools to create and manage the observability for your application. It includes tools to create and manage Prometheus, Grafana, and OpenTelemetry.
Create a working directory and go to it. Then run the following command to create a new project for Observability Foundry.
$ mkdir o11y && cd o11yService Foundry init step
Run the command to generate 'o11y-foundry-config.yaml' file.
$ yo nsa2:o11y-foundry initThe command will ask you to enter the following information:
? Kubernetes namespace? o11y
? Cloud Provider (Azure, AWS, GCP) (Use arrow keys)
? Container Registry (ACR or ECR. e.g. my-cr.azurecr.io)
? Root domain (e.g. example.com)
Here is the description of each argument:
| Argument | Description |
|---|---|
Kubernetes namespace |
The namespace where the observability tools will be installed. |
Cloud Provider |
The cloud provider where the Kubernetes cluster is running. (AWS, Azure, GCP). When pushing Docker images to the Container Registry, the generator will use the CLI commnand of the cloud provider. |
Container Registry |
The Container Registry where the Docker images will be pushed. (e.g. my-cr.azurecr.io) |
Root domain |
The root domain for the observability tools. (e.g. example.com) |
Service Foundry generate(or gen) step
Run the command below to generate required files including:
$ yo nsa2:o11y-foundry generateThe command will generate the following Kubernetes files:
$ tree k8s

k8s
├── common
│   ├── kustomization.yaml
│   └── observability-configmap.yaml
├── grafana
│   ├── grafana-admin-credentials.yaml
│   ├── grafana-client-secret.yaml
│   └── kustomization.yaml
├── jaeger-collector
│   └── jaeger-collector.yaml
├── opentelemetry-operator
│   └── opentelemetry-operator.yaml
├── otel-collector
│   ├── kustomization.yaml
│   ├── otel-collector-rbac.yaml
│   ├── otel-collector.yaml
│   ├── otel-targetallocator-cr-role.yaml
│   └── otel-targetallocator-role.yaml
├── prometheus
│   ├── kustomization.yaml
│   ├── prometheus-rbac.yaml
│   ├── prometheus-service.yaml
│   └── prometheus.yaml
└── prometheus-operator
    └── bundle.yaml
The command will also generate the following Helm files:
$ tree helm-charts

helm-charts
├── cassandra
│   ├── cassandra-12.1.1.tgz
│   ├── cassandra-credentials.yaml
│   ├── cassandra-initdb-configmap.yaml
│   └── cassandra-values.yaml
├── cert-manager
│   ├── cert-manager-v1.17.1.tgz
│   └── custom-values.yaml
├── grafana
│   ├── grafana-8.8.5.tgz
│   └── grafana-values.yaml
├── oauth2-proxy
│   ├── custom-values.yaml
│   └── oauth2-proxy-7.12.6.tgz
└── opensearch
    ├── data-prepper-0.3.1.tgz
    ├── data-prepper-values.yaml
    ├── esnode-certs.yaml
    ├── opensearch-2.30.1.tgz
    ├── opensearch-2.32.0.tgz
    ├── opensearch-dashboards-2.26.0.tgz
    ├── opensearch-dashboards-2.28.0.tgz
    ├── opensearch-dashboards-values.yaml
    └── opensearch-values.yaml
This command will also generate the following shell files:
$ tree bin

bin
├── deploy-cassandra.sh
├── deploy-grafana.sh
├── deploy-jaeger.sh
├── deploy-nsa2-otel-exporter.sh
├── deploy-opensearch-stack.sh
├── deploy-otel-collector.sh
├── deploy-otel-spring-example.sh
├── deploy-prometheus.sh
├── undeploy-cassandra.sh
├── undeploy-grafana.sh
├── undeploy-jaeger.sh
├── undeploy-nsa2-otel-exporter.sh
├── undeploy-opensearch-stack.sh
├── undeploy-otel-collector.sh
├── undeploy-otel-spring-example.sh
└── undeploy-prometheus.sh
With the script files, you can easily deploy and undeploy the observability tools. When using deploy step, all the tools will be installed in the Kubernetes cluster. When using undeploy step, all the tools will be uninstalled from the Kubernetes cluster.
Service Foundry build step
For the o11y-foundry module, you need to build the Docker images and push them to the Container Registry. You can use the following command to build the Docker images and push them to the Container Registry.
$ yo nsa2:o11y-foundry buildTo verify the Docker images, you can use the following command to list the Docker images in the Container Registry.
$ aws ecr describe-repositories --query 'repositories[*].repositoryName'

# Example output
- nsa2-otel-exporter
- o11y-otel-spring-example
Service Foundry deploy step
Run the command below to deploy the generated files to your Kubernetes cluster.
$ yo nsa2:o11y-foundry deployTo verify the installation, you can use the following command to list the Kubernetes resources in the Kubernetes cluster.
$ kubectl get all -n o11yExample output:
Expand to see the output
NAME                                         READY   STATUS    RESTARTS      AGE
pod/cassandra-0                              1/1     Running   0             12m
pod/cassandra-1                              1/1     Running   0             10m
pod/cassandra-2                              1/1     Running   0             8m56s
pod/data-prepper-549b89cc4c-9dk6r            1/1     Running   0             11m
pod/grafana-f454859cb-n47n6                  1/1     Running   0             11m
pod/jaeger-collector-6666cdf7b9-b9qrs        1/1     Running   4 (10m ago)   11m
pod/opensearch-cluster-master-0              1/1     Running   0             11m
pod/opensearch-cluster-master-1              1/1     Running   0             11m
pod/opensearch-cluster-master-2              1/1     Running   0             11m
pod/opensearch-dashboards-6c9cddc4c4-wsp9r   1/1     Running   0             11m
pod/otel-collector-0                         1/1     Running   2 (11m ago)   11m
pod/otel-targetallocator-549986cb8c-bk8cp    1/1     Running   0             11m
pod/prometheus-prometheus-0                  2/2     Running   0             11m

NAME                                         TYPE        CLUSTER-IP       EXTERNAL-IP   PORT(S)                                  AGE
service/cassandra                            ClusterIP   10.100.31.101    <none>        9042/TCP                                 12m
service/cassandra-headless                   ClusterIP   None             <none>        7000/TCP,7001/TCP,7199/TCP,9042/TCP      12m
service/data-prepper                         ClusterIP   10.100.245.211   <none>        2021/TCP,21890/TCP,21891/TCP,21892/TCP   11m
service/grafana                              ClusterIP   10.100.55.223    <none>        80/TCP                                   11m
service/jaeger-collector                     ClusterIP   10.100.15.158    <none>        16686/TCP,4317/TCP,4318/TCP              11m
service/jaeger-collector-extension           ClusterIP   10.100.211.28    <none>        16686/TCP                                11m
service/jaeger-collector-headless            ClusterIP   None             <none>        16686/TCP,4317/TCP,4318/TCP              11m
service/jaeger-collector-monitoring          ClusterIP   10.100.116.125   <none>        8888/TCP                                 11m
service/opensearch-cluster-master            ClusterIP   10.100.55.192    <none>        9200/TCP,9300/TCP,9600/TCP               11m
service/opensearch-cluster-master-headless   ClusterIP   None             <none>        9200/TCP,9300/TCP,9600/TCP               11m
service/opensearch-dashboards                ClusterIP   10.100.217.97    <none>        5601/TCP,9601/TCP                        11m
service/otel-collector                       ClusterIP   10.100.74.170    <none>        4317/TCP,4318/TCP                        11m
service/otel-collector-headless              ClusterIP   None             <none>        4317/TCP,4318/TCP                        11m
service/otel-collector-monitoring            ClusterIP   10.100.13.37     <none>        8888/TCP                                 11m
service/otel-targetallocator                 ClusterIP   10.100.211.248   <none>        80/TCP                                   11m
service/prometheus                           NodePort    10.100.114.238   <none>        9090:32709/TCP                           11m
service/prometheus-operated                  ClusterIP   None             <none>        9090/TCP                                 11m

NAME                                    READY   UP-TO-DATE   AVAILABLE   AGE
deployment.apps/data-prepper            1/1     1            1           11m
deployment.apps/grafana                 1/1     1            1           11m
deployment.apps/jaeger-collector        1/1     1            1           11m
deployment.apps/opensearch-dashboards   1/1     1            1           11m
deployment.apps/otel-targetallocator    1/1     1            1           11m

NAME                                               DESIRED   CURRENT   READY   AGE
replicaset.apps/data-prepper-549b89cc4c            1         1         1       11m
replicaset.apps/grafana-f454859cb                  1         1         1       11m
replicaset.apps/jaeger-collector-6666cdf7b9        1         1         1       11m
replicaset.apps/opensearch-dashboards-6c9cddc4c4   1         1         1       11m
replicaset.apps/otel-targetallocator-549986cb8c    1         1         1       11m

NAME                                         READY   AGE
statefulset.apps/cassandra                   3/3     12m
statefulset.apps/opensearch-cluster-master   3/3     11m
statefulset.apps/otel-collector              1/1     11m
statefulset.apps/prometheus-prometheus       1/1     11m
Working with sso-foundry modules
The sso-foundry module is a set of tools to create and manage the Single Sign-On (SSO) for your application. It includes tools to create and manage Keycloak, OAuth2 Proxy, and OpenID Connect.
The sso-foundry works with Kubernetes services and Ingress resources to add authentication and authorization to your application.
Let’s create a working directory and go to it. Then run the following command to create a new project for SSO Foundry.
$ mkdir sso && cd ssoService Foundry init step
Run the command to generate 'sso-foundry-config.yaml' file.
$ yo nsa2:sso-foundry init

? Namespace o11y
? Root Domain(eg. example.com) nsa2.com
The command will ask you to enter the following information:
Argument |
Description |
Namespace |
The namespace where the SSO tools will be installed. |
Root Domain |
The root domain for the SSO tools. (e.g. example.com) |
Service Foundry generate(or gen) step
Run the command below to generate required files including:
$ yo nsa2:sso-foundry generateThe command will generate the following Kubernetes files:
$ tree k8s

k8s
├── keycloak
│   ├── keycloak-credentials-secret.yaml
│   ├── keycloak-namespace.yaml
│   ├── keycloak-postgresql-credentials-secret.yaml
│   ├── kustomization.yaml
│   └── nsa2-realm-export.json
├── oauth2-proxy
│   ├── kustomization.yaml
│   ├── oauth2-proxy-config.yaml
│   └── oauth2-proxy-secret.yaml
└── traefik
    ├── forward-auth-middleware.yaml
    ├── kustomization.yaml
    ├── o11y-sso-ingress.yaml
    └── oauth2-proxy-ingress.yaml
The command will also generate the following Helm files:
$ tree helm-charts

helm-charts
├── keycloak
│   ├── custom-values.yaml
│   └── keycloak-24.4.13.tgz
└── oauth2-proxy
    ├── custom-values.yaml
    └── oauth2-proxy-7.12.6.tgz
The command will also generate the following Terraform files:
$ tree terraform

terraform
└── keycloak
    ├── main.tf
    ├── terraform.tfstate
    ├── terraform.tfstate.backup
    ├── terraform.tfvars
    └── variables.tf
The command will also generate the following shell files:
$ tree bin

bin
├── deploy-keycloak.sh
└── undeploy-keycloak.sh
Service Foundry build step
|
The sso-foundry module does not need to push custom Docker images to the Container Registry. So, you can skip the 'build' step. |
Service Foundry deploy step
Run the command below to deploy the generated files to your Kubernetes cluster.
$ yo nsa2:sso-foundry deployVerify the installation by running the following command:
$ kubectl -n o11y get ingressExample output:
Expand to see the output
NAME                   CLASS     HOSTS                                                              ADDRESS                                                                  PORTS   AGE
o11y-sso-ingress       traefik   jaeger.nsa2.com,prometheus.nsa2.com,grafana.nsa2.com + 1 more...   ae4306323ae09437d9c125327de37cd0-715418189.ca-west-1.elb.amazonaws.com   80      3m32s
oauth2-proxy-ingress   traefik   oauth2-proxy.nsa2.com                                              ae4306323ae09437d9c125327de37cd0-715418189.ca-west-1.elb.amazonaws.com   80      3m31s
DNS setting
oauth2-proxy:
  enabled: true
  namespace: o11y
  release-name: oauth2-proxy  # release name for helm
  ingresses:
    - name: o11y-sso-ingress
      namespace: o11y
      services:
        - service-name: jaeger-collector
          port-name: jaeger
          subdomain: jaeger
        - service-name: prometheus
          port-name: web
          subdomain: prometheus
        - service-name: grafana
          port-name: service
          subdomain: grafana
        - service-name: opensearch-dashboards
          port-name: http
          subdomain: os-dashboards
The base domain that we input in the init step is used to create the DNS records for the SSO tools. http://{subdomain}.{base_domain} is used to access the SSO tools. For example, http://jaeger.nsa2.com is used to access the Jaeger UI.
Here is an example of the DNS records that are created for the SSO tools:
{traefik-service-lb-ip-address}   jaeger.nsa2.com
{traefik-service-lb-ip-address}	  prometheus.nsa2.com
{traefik-service-lb-ip-address}	  os-dashboards.nsa2.com
{traefik-service-lb-ip-address}	  oauth2-proxy.nsa2.com
{traefik-service-lb-ip-address}	  grafana.nsa2.com
Let’s navigate to the Jaeger UI using the following URL:
To access those URLs, username and password are required. The credentials are created in the Keycloak server, which is devops user and password.
So far, we have learned how Service Foundry works with the infra-foundry, o11y-foundry, and sso-foundry modules.
Clean up
To clean up the resources created by Service Foundry, you can use the following command:
$ yo nsa2:sso-foundry clean
$ yo nsa2:o11y-foundry clean
$ yo nsa2:infra-foundry clean
The order of the clean-up is important. The sso-foundry module should be cleaned up first, then the o11y-foundry module, and finally the infra-foundry module. This is because the sso-foundry module depends on the o11y-foundry module, and the o11y-foundry module depends on the infra-foundry module.
Service Foundry Submodules
Apart from infra-foundry, Service Foundry has several submodules that can be used to create and manage Kubernetes resources for a certain application. The submodules are:
-
infra-foundry
-
o11y-foundry
-
sso-foundry
-
backend-foundry
-
bigdata-foundry
-
and more…
For more information about each submodule, please refer to the documentation of each submodule.